How to Upload Metadata for Minting an NFT

Uploading metadata is an essential step when creating an NFT (Non-Fungible Token). Metadata provides important information to collectors such as attributes, rarity, and the media file. If you are looking to create a collection with TradePort, we'll walk you through the basics of how to prepare and upload your NFT’s metadata, ensuring your digital creation is well-represented and accessible on the blockchain.

Step 1. Understanding How to Create Your NFT Metadata
Metadata acts as the digital identity card for your NFT, encapsulating essential information that differentiates your token from others.
Think of metadata as the backbone of your NFT. It not only tells the story of your digital asset but also ensures its uniqueness and authenticity on the blockchain. Here’s an illustrative example to help you understand the structure and content of NFT metadata:
Json:
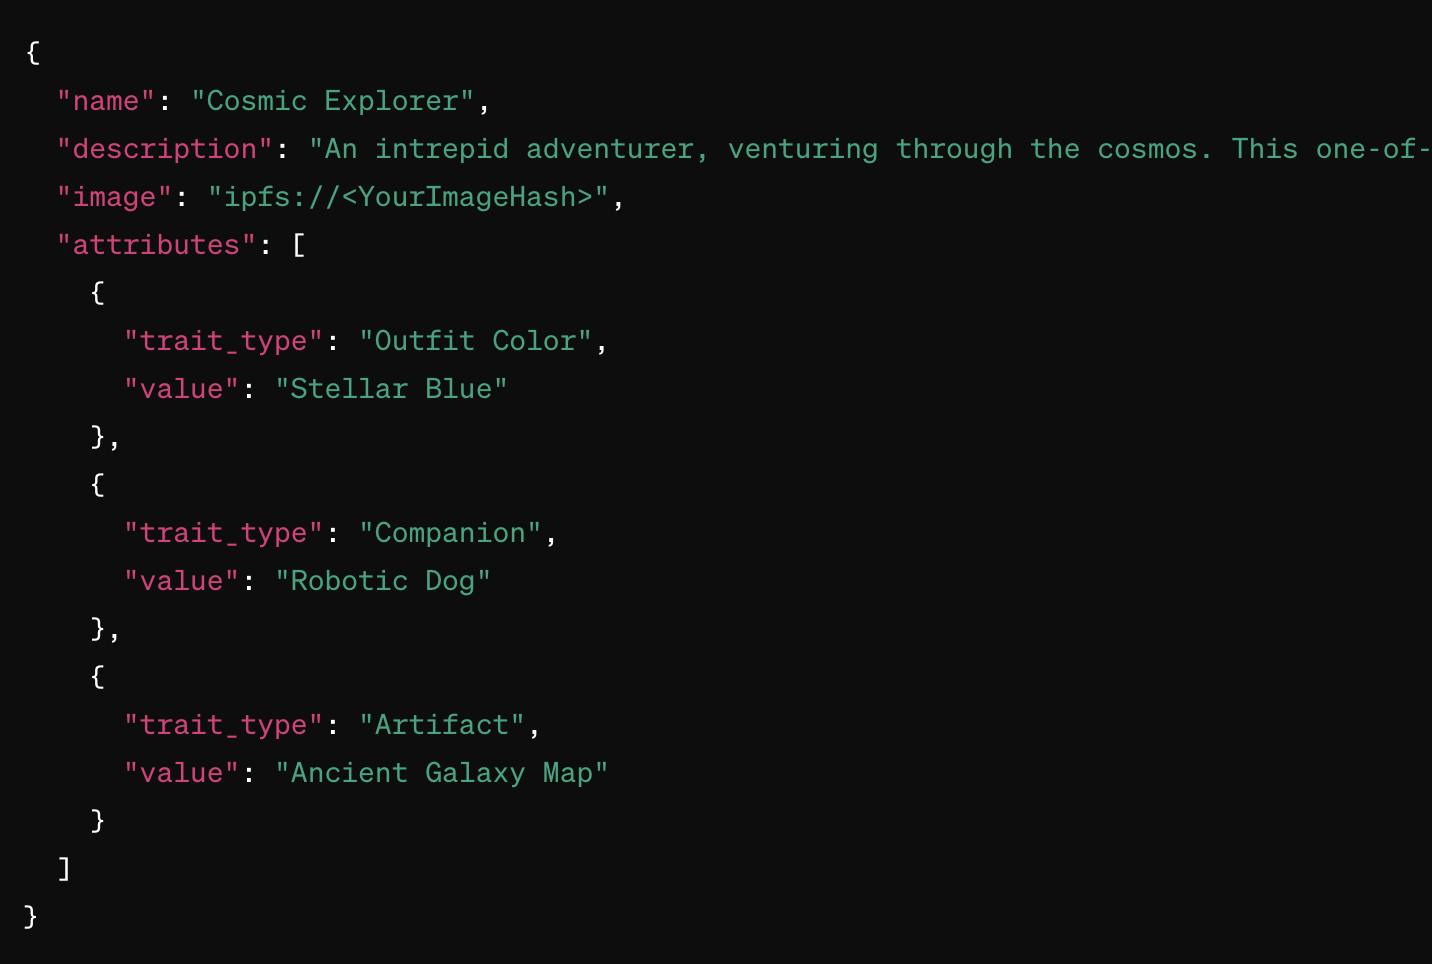
In this metadata example:
- "name": "Cosmic Explorer" is the title of your NFT. Choose a name that captures the essence of your digital asset.
- "description": This is where you tell the story behind your NFT or provide details about what it represents. It’s an opportunity to connect emotionally with potential collectors.
- "image": The URL pointing to the image of your NFT stored on IPFS. At this stage, <YourImageHash> is a placeholder for the unique hash you will receive after uploading your image to IPFS.
- "attributes": This array lists the distinctive traits of your NFT. Each attribute has a "trait_type", which is the category of the trait, and a "value", which is the specific trait. Attributes play a significant role in defining the uniqueness and potentially the rarity of your NFT within a collection.

Tips for Crafting Metadata:
- Be Descriptive: Use the description field to engage and intrigue your audience. More than just an explanation, it's a storytelling opportunity.
- High-Quality Image: Ensure your image is of high quality and represents your NFT well, as this will be the visual representation of your asset on marketplaces.
- Unique Attributes: The more detailed and unique your attributes, the more they can contribute to the rarity and desirability of your NFT. Consider aspects like background stories, special powers, or physical characteristics.
- Consistency is Key: If you're creating a series of NFTs, maintain consistency in your metadata structure. This helps in creating a cohesive collection.
Prepare Image and Metadata Files: Have your image file ready and create a JSON file for your metadata on your computer.
Preparing Your Toolkit for NFT Creation
Embarking on your NFT creation journey requires setting up the right tools and environment. This process ensures you have everything you need to design, generate, and prepare your NFTs for minting. Here’s a beginner-friendly guide to getting started:
Essential Tools and Installation
1. Node.js and npm: These are foundational tools for running JavaScript projects like the HashLips Art Engine. Node.js is a runtime environment that allows you to execute JavaScript code outside of a web browser, while npm (Node Package Manager) helps manage the packages your project depends on.
- Visit nodejs.org to download and install Node.js. Installing Node.js automatically installs npm, setting the stage for using the HashLips Art Engine.
2. Git: A version control system that lets you track changes and collaborate on projects. Git is essential for downloading (cloning) the HashLips Art Engine repository to your local machine.
- Download and install Git from git-scm.com. Follow the installation instructions suitable for your operating system.
3. Code Editor: A code editor is where you'll spend much of your time editing files, including your NFT metadata and configuration files. Visual Studio Code (VS Code) is a popular, feature-rich editor that supports a wide range of programming languages and has useful extensions for development.
- Download Visual Studio Code from code.visualstudio.com and install it on your computer.

Setting Up Your Engine
The Engine from HashLips Art is an optional tool for generating NFT collections, including both the artwork and metadata. Here’s how to get it up and running:
1. Clone the HashLips Art Engine Repository:
- Open your terminal or command prompt.
- Run the following command to clone the repository:
Bash:

- This command downloads the HashLips Art Engine project to your local machine.
2. Install Dependencies:
Navigate to the project directory in your terminal by using cd hashlips_art_engine.
Execute npm install to install the project dependencies. These are packages that the HashLips Art Engine requires to run successfully.
3. Configure Your NFT Collection:
- Open the config.js file in your code editor. This file is where you'll define the specifics of your NFT collection, such as how many unique tokens to generate, the resolution of the images, and the structure of your artwork layers.
- Customize the settings in config.js to reflect your vision for the collection. Pay special attention to the layers' configuration, as this determines how your NFT images are composed.
4. Prepare Your Artwork Layers:
- Within the layers directory of the HashLips Art Engine project, organize your artwork components into subfolders. Each subfolder represents a layer type (e.g., background, body, accessories) and contains the images that make up that layer.
- Naming and organizing your layers carefully is crucial, as the engine generates the final NFT images based on these layers.
Adding Different Weights to Each Attribute
1. Understand Attribute Weighting
Attribute weighting allows you to control how often specific traits appear across your NFT collection. By assigning weights to different attributes, you can make some traits rare and others more common. This is particularly useful for creating a collection with a wide range of rarity levels among the NFTs.
2. Modify the Configuration File
The HashLips Art Engine uses a configuration file (config.js) to manage the generation of your NFT collection, including attribute weighting. To add weights to your attributes, you will need to modify this file.
3. Define Layer Configurations with Weights
In the config.js file, you'll find a section for defining layer configurations. Here, each layer (such as background, body, accessories) is defined along with its components. To add weights, you simply include a weight value alongside each component within a layer. For example:
Javascript:
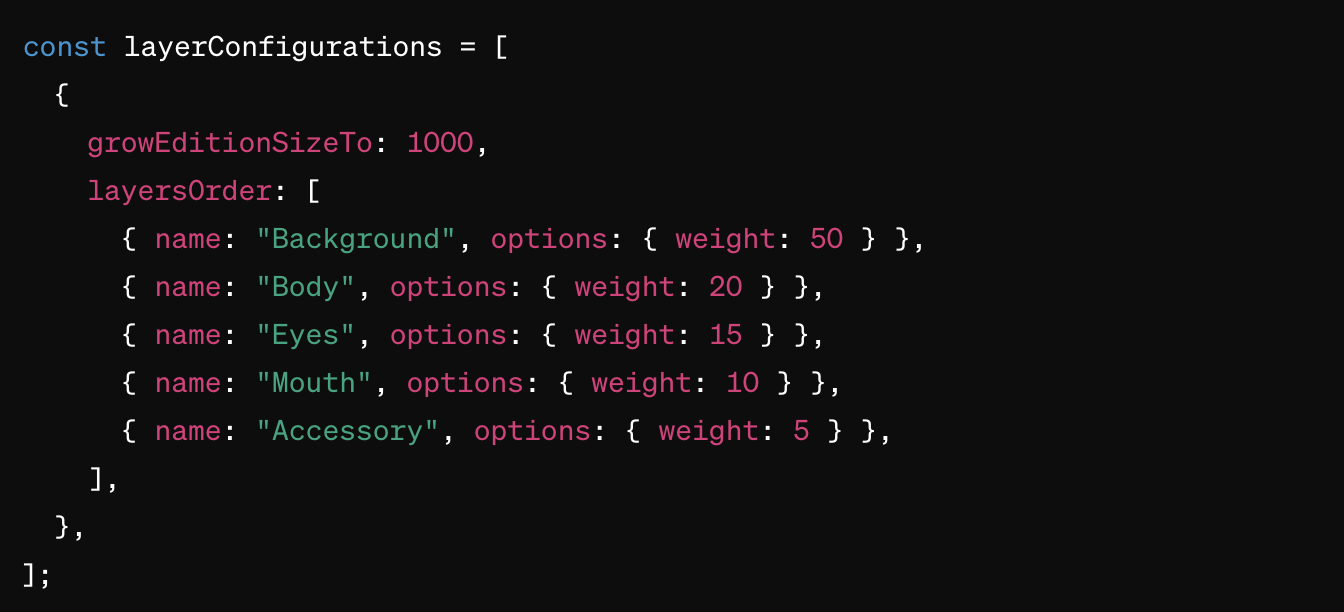
In this example, the weight property dictates how frequently an attribute appears. Higher weights mean the attribute is more common, while lower weights indicate rarity.
4. Adjust Weights According to Your Rarity Strategy
The key to a successful NFT collection is a well-thought-out rarity strategy. Decide which traits should be rare and which should be common, then adjust their weights accordingly. Keep in mind the total edition size of your collection, as this will influence how rarity is perceived.
Step 2: Upload Your Files to IPFS
To make your NFT accessible and stored in a decentralized manner, you'll utilize the InterPlanetary File System (IPFS). IPFS is a protocol and peer-to-peer network for storing and sharing data in a distributed file system. By uploading your NFT's image and metadata to IPFS, you ensure that your digital asset is permanently available across the network, without relying on a single point of failure. Here's a detailed breakdown of how to accomplish this:
Here’s a detailed walkthrough for beginners on how to upload your files to IPFS, using services like Pinata, NFT Storage, and Infura:
Choosing an IPFS Hosting Service
Several services facilitate the uploading of files to IPFS, making the process user-friendly even for beginners. Services like Pinata, NFT.Storage and Infura offer interfaces that abstract away the complexities of interacting with IPFS directly. Here’s what they offer:
Pinata: Offers easy-to-use tools for uploading and managing files on IPFS. It provides a dashboard where you can track your uploads and access them using IPFS CIDs (Content Identifiers).
NFT Storage: Specifically designed for NFTs, this service offers free storage solutions for NFT assets. It ensures that NFT data is stored reliably and redundantly across the network.
Infura: Provides a suite of tools for developing and scaling projects on blockchain, including IPFS support. It's a more comprehensive solution for developers looking to integrate IPFS into their applications directly.
Each of these platforms provides documentation and guides to help you get started with uploading your files.
Uploading Your NFT Image
- Prepare Your Image: Ensure your NFT image is in a web-friendly format (e.g., PNG, JPG, GIF) and of high quality. This image will be how your NFT is visually represented across marketplaces and galleries.
- Upload to Your Chosen Service: Navigate to the upload section of your selected IPFS hosting service. Follow the prompts to upload your image file. Upon successful upload, the service will provide you with an IPFS CID, a unique identifier for your file on the IPFS network.
Updating Your Metadata with the Image CID
- Modify Your Metadata JSON: Open your metadata JSON file in your code editor. Locate the "image": "ipfs://YourImageHashHere" line and replace "YourImageHashHere" with the CID you received after uploading your image. This links your NFT directly to its visual representation on IPFS.
- Ensure Accuracy: Double-check the CID in your metadata file to ensure it's correctly entered. This step is crucial as any mistake could lead to a broken link for your NFT's image.
Uploading Your Metadata JSON
- Finalize Your Metadata: With the image CID correctly embedded in your metadata JSON file, your metadata is ready to be uploaded. This file contains all the necessary information about your NFT, including its name, description, attributes, and the link to its image on IPFS.
- Upload to IPFS: Return to your IPFS hosting service and upload the metadata JSON file. Like with the image file, you'll receive a CID for the metadata file upon successful upload.
- Record the Metadata CID: This CID is what you'll use during the minting process on the blockchain to associate your NFT with its metadata and image. It's a crucial link that ensures your NFT is displayed with the correct information and artwork across platforms.
Step 3: Mint Your NFT
- Blockchain Platform: Go to the blockchain platform where you want to mint your NFT.Could be any blockchain that supports NFTs. Each platform has its own process and requirements for minting.
- Connect Your Wallet: Connect your cryptocurrency wallet to the platform. Ensure you have enough cryptocurrency to cover the transaction fees associated with minting.
- Minting Process: Follow the platform’s process for minting an NFT. When prompted, provide the IPFS CID of your metadata file. This step varies significantly depending on the platform, so refer to specific instructions provided by the platform.
- Confirm and Complete: Confirm the transaction in your wallet. Once the minting process is complete, your NFT will be a part of the blockchain, with its metadata stored securely on IPFS and accessible via the CID you provided.

Additional Tips
- Metadata Standards: Ensure your metadata follows the standards expected by the NFT marketplace or platform you're using. For Ethereum-based NFTs, this typically means adhering to the ERC-721 or ERC-1155 metadata standards.
- Testing: If possible, test your minting process on a testnet (such as Rinkeby for Ethereum) to avoid unnecessary costs and ensure everything works as expected.
- Security: Be cautious and ensure the security of your wallet and private keys throughout this process.
In Short
Successfully uploading metadata for NFT minting combines creative detail with technical precision, ensuring your digital asset's uniqueness and accessibility on the blockchain. Follow this guide as a stepping stone towards confidently navigating the exciting world of NFT minting.
Improve your journey and get ahead using Indexer API on Indexer.xyz for important insights and to make your portfolio better. Come join us on this creative adventure and let's create amazing NFTs together using Indexer API!