How to Create a ‘Buy the Floor’ Button


Creating a "Buy the Floor" button, especially in the context of NFTs (Non-Fungible Tokens), requires a blend of front-end development skills and an understanding of blockchain technology. The "floor price" refers to the lowest price at which an NFT within a specific collection can be purchased.
Here's a high-level overview of the steps involved in creating a "Buy the Floor" button:
Understand the Marketplace API
1. You'll need to interact with the NFT marketplace's API where the collection is hosted.
You can use our Indexer API to use and fetch NFT collection data, including floor prices, you'll need to:
1- Find API Endpoints:
Examine the marketplace's API documentation. This resource provides comprehensive details on available endpoints, including their structure and the required parameters. Specifically, focus on sections of the documentation that discuss collection statistics or pricing information
2- API Authentication:
Some APIs require an API key. Typically this involves keeping the key in server-side environments or encrypted storage, away from client-side code, to safeguard against unauthorized use and potential security breaches.
3- Rate Limits:
Be mindful of API rate limits to avoid being blocked. So it's advisable to implement mechanisms in your application that monitor and regulate the rate of requests sent, such as queuing requests or using caching strategies to reduce the need for frequent API calls.
2. Learn how to query the API to get the current floor price of an NFT collection:
- Closely examine the API documentation to identify relevant endpoints.
- Pinpoint the specific endpoint that provides floor price data.
- Integrate error handling into your requests to manage unexpected API responses or issues effectively.
- Implement rate limiting in your requests to comply with the API's usage policies and ensure your application's stable interaction with the API.

Front-End Development
To integrate a "Buy the Floor" button into your web interface, you'll employ a combination of HTML, CSS, and JavaScript or a modern JavaScript framework like React or Vue. Here’s a breakdown of each step:
HTML (HyperText Markup Language)
Button Creation: In your HTML file, you'll create a button element that users can click to buy the NFT at its floor price. This involves using the <button> tag, possibly with an id or class attribute to uniquely identify it. For example: <button id="buyFloorButton">Buy the Floor</button>.
CSS (Cascading Style Sheets)
Styling the Button: With CSS, you'll define the visual appearance of your button—its colors, dimensions, typography, and hover effects. This enhances the user interface and improves user experience. For instance:
CSS:

This CSS code will make the button visually appealing and clearly indicate it is clickable.
JavaScript or JavaScript Frameworks (React, Vue, etc.)
Handling the Click Event: To make the button functional, you'll use JavaScript or a JavaScript framework. This involves writing a function that's called when the button is clicked, triggering the process to fetch the floor price and initiate a purchase. With plain JavaScript, you might add an event listener to the button:
Javascript:

In a framework like React, you would handle the click event within a component, using the framework's syntax to manage the event:
Jsx:
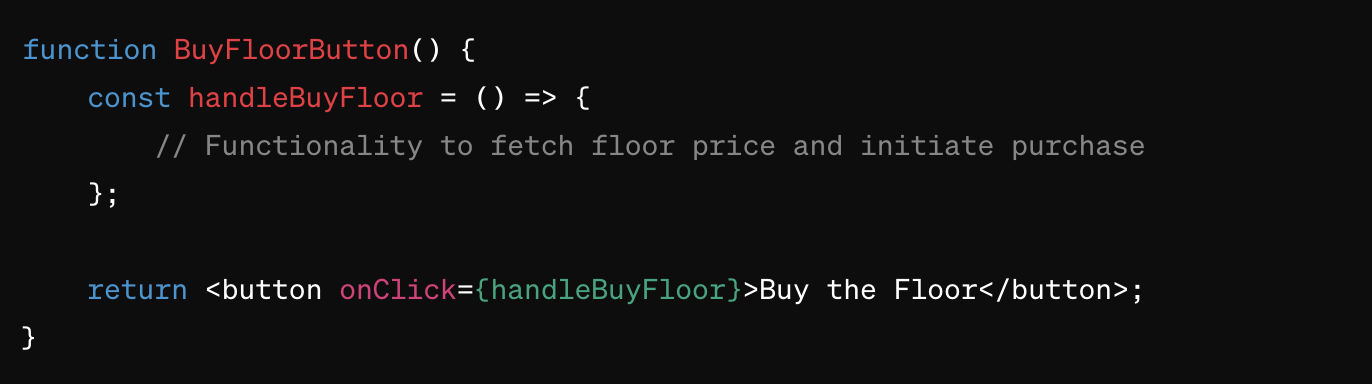
This approach ensures the button fits seamlessly into your web interface and actively responds to user interactions, leading to the desired action of buying the NFT at its floor price.
1- Fetch the Floor Price
Here's a detailed breakdown of how to programmatically fetch the floor price and relevant NFT details using JavaScript:
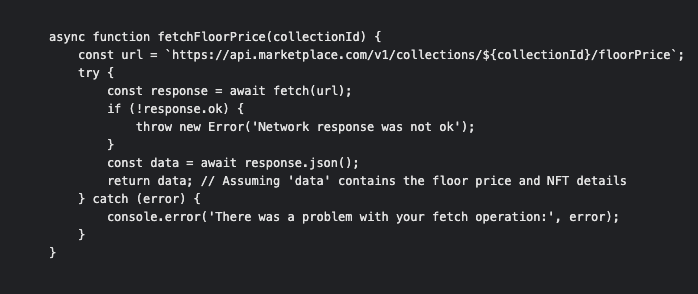
2- Initiate a Fetch Request
Upon the button click, your JavaScript code should make an asynchronous request to the marketplace's API. Utilizing the fetch function in JavaScript offers a straightforward way to make this request:
Javascript:
3- Extract Floor Price and NFT Details
The API response, typically in JSON format, needs to be parsed to extract useful data. This includes the floor price of the collection and any specific details about the NFT available at this price (e.g., token ID, image URL, and description).
4- Utilize the Extracted Data
Once you have the floor price and NFT details, you can use this information within your application. For instance, you might display the floor price to the user, or proceed to initiate a purchase transaction for the NFT at the floor price.

Integrate Blockchain Transactions
Integrating blockchain functionality into your application, especially for interacting with NFTs and initiating transactions, involves leveraging Web3 libraries such as web3.js or ethers.js.
Here’s how to incorporate this feature:
1- Integrating a Web3 Library
First, choose a Web3 library that suits your project's needs. Both web3.js and ethers.js are popular choices, offering comprehensive features for interacting with the Ethereum blockchain.
web3.js:
A collection of libraries that allow you to interact with a local or remote ethereum node, using HTTP, IPC, or WebSocket.
ethers.js:
A lightweight library that aims to be a complete and compact library for interacting with the Ethereum Blockchain and its ecosystem.
2- Connecting to the User's Wallet
Your application must be able to connect to the user's cryptocurrency wallet, such as MetaMask or Coinbase Wallet. This connection is essential for initiating transactions with the user's consent.
Prompting Wallet Connection:
Use the Web3 library to check if the user's browser has a cryptocurrency wallet extension installed. If so, prompt the user to connect their wallet to your application. This typically involves calling a method like ethereum.request({ method: 'eth_requestAccounts' }) to request access to their Ethereum accounts.
3- Initiating a Purchase Transaction
Once you have the floor price and the user's wallet is connected, you can proceed to create a function to initiate a purchase transaction for the NFT at the floor price.
Creating the Transaction:
Use the details fetched from the API, including the NFT's contract address and token ID, along with the floor price, to construct a transaction. This transaction will call a function on the NFT's smart contract to execute the purchase.
Sending the Transaction:
With the Web3 library, construct the transaction object, which includes the recipient address (the NFT contract), the value (the floor price, if purchasing with ETH), and data (the encoded function call for the purchase). Then, use the user's wallet to sign and send the transaction. For example, using ethers.js:
Javascript:
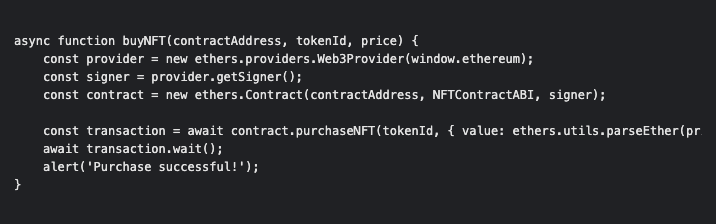
The NFTContractABI is the ABI (Application Binary Interface) of the NFT's smart contract, which you'll need to interact with it. The purchaseNFT function is a hypothetical function within the smart contract designed for buying an NFT, and its implementation details will vary based on the specific contract.
Testing
- Test the "Buy the Floor" feature thoroughly on a testnet before deploying it on the mainnet to avoid costly mistakes.
- Ensure compliance with legal and regulatory requirements related to cryptocurrency transactions in your jurisdiction.

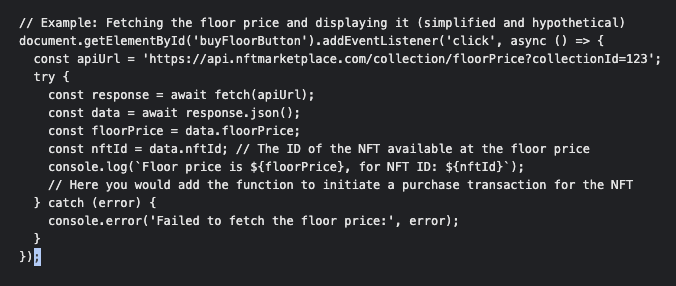
Example Code Snippet:
Below is a simplified JavaScript example to illustrate the concept. This example does not include the actual blockchain transaction part, which would depend on the specific blockchain and NFT marketplace API you're working with.
Javascript:
Final Thoughts
It's a multifaceted challenge that requires a keen eye for detail, solid security measures, and a commitment to providing value to users in the NFT space. Through careful planning, continuous testing, and ongoing iteration based on user feedback, you can create a feature that enhances the NFT buying experience, making it more accessible and efficient for everyone involved.
Interested in NFT and Blockchain Indexing?
Dive into Indexer.xyz for easy access to blockchain data. Our Indexer API is user-friendly, helping you find key insights and navigate blockchain easily for your projects!